Search This Blog & Web

Thursday, June 22, 2017

Creating Alias name for MSSQL Server Instance

Recently we shifted our production database server to new SQL Server instance. Once that activity completed we face a lot of issues to change connection string for running application from one server to other. One the major application is SharePoint because you can’t open Central administration from SharePoint server unless your instance name will be same as before.
After doing some research we find a way around for this problem. We can create database server Alias and Alias name will be same as previous database instance name so that all applications will work as they are working before. Other possible uses to create aliases are database server security in order to hide you database server name or you can create it when Named instance is there to make it easy.
In following scenario, we have Database server with Named Instance. We created Alias to qualify simple name and smooth application execution without changing much. Following are the steps to create Alias.

Open SQL Server configuration manager and go to SQL Native Client Configuration. Click to Aliases as shown in diagram


--

You need to provide following information
Alias name: Name that you want to set for Database server
Port number: Write dynamic or specific port to connect
Protocol: It can be TCP/IP preferably or Name pipe. Selected protocol must be enabled in client protocols.
Server Name: For named instance you need to mention machine\instance name, For default instance we can mention local host.

You can mention specific port number or you can find dynamic port from SQL Server Network Configuration. Open TCP/IP properties and go all the way down you will see IPAll.


--
If you have 64 bit operating system you need to configure Aliases in SQL Native Client 11.0 configuration and SQL Native Client 11.0 Configuration (32bit).


--

In the following screen shot. You can see both Instances are connected.


--

Sunday, May 28, 2017

Changing and verifying SQL Server Status from Linux (Ubuntu)

Recently we learn how to install SQL Server on Linux and how to use it. As a database administrator we need to check current database status as well as need to enable and disable it on demand. In the following post we will learn how to check current database status and change it using Linux command shell.

Once you install MSSQL Server in Ubuntu, You need to restart Linux machine in order to finish installation. SQL Server engine will automatically start as “Active” after restart. In the following post we will learn how to verify and change its status like Start, Stop, Disable and Enable.
1-      Verify running status for MSSQL Server using following command
“ systemctl status mssql-server”
You can see the status in green color.

2-      We can change MSSQL Server status using following sudo command
“sudo systemctl stop mssql-server”
To verify current database status you will repeat same step as above “ systemctl status mssql-server”.

3-      Using following command We can disable MSSQL Server engine using following sudo command
“sudo systemctl disable mssql-server” and can verify by executing as “ systemctl status mssql-server”.

4-      To enable MSSQL Server engine we can using same sudo command
“sudo systemctl enable mssql-server” and can verify by executing as “ systemctl status mssql-server”

5-      Finally MSSQL Server is up and active.


Thursday, May 25, 2017

SQL Server on Linux step 3: Linux (Ubuntu ) Installing SQL SERVER vNext

In my previous post we learn how to install Linux through Oracle Vitual box that you can found from following link

After finishing your Ubuntu installation, you are ready to install SQL Server. You can install it through Ubuntu or your host windows using command line. Installing from Windows you need to install putty easily available on internet. Install it and connect it using Network IP and run all steps mentioned below. 
I am installing it through Ubuntu plate form and following are the steps for that

1-      Execute “sudo apt-get update”
2-      Execute “sudo apt-get upgrade” is an optional step


3-      Run curl command to import GPG key. GPG keys also provide cryptographic privacy and authentication. If curl command is not installed on this machine so we need to run the suggested command to install the curl command first.


4-      After successful installation of curl, we can import key using following command and add it using sudo command.
“curl https://packages.microsoft.com/key/microsoft.asc | sudo apt-key add –“


5-      Due to some network and internet problem I was unable to register key directly from Microsoft site. So if key download fails download key from mentioned path. https://packages.microsoft.com/key/microsoft.asc you can find it in downloads, Open the file, Save it as .asc file and open it in terminal


6-      From the terminal windows register key from the following command
“ sudo apt-key add microsoft.asc”


7-      After successfully registering GPG key download mssql server from following path.
“curl https://packages.microsoft.com/config/ubuntu/16.04/mssql-server.list | sudo tee /etc/apt/sources.list.d/mssql-server.list”


8-      You can check the folder and rights to the downloaded file by executing ls -lrt
“ls –lrt /etc/apt/sources.list.d”


9-      After executing all run “sudo apt-get update” before installing SQL Server.


10-   Now you are ready to install SQL Server now. Start SQL Server installation using following command.
“sudo apt-get install –y mssql-server”


11-   Installation will continue as we can see installation percentage. It will take some time depending on internet connection. Installation will complete with the config setup message.


12-   As mentioned in the message, To complete SQL Server setup run following command
“sudo opt/mssql/bin/mssql-conf setup”
It will prompt license agreement message.


13-   After completing above step Microsoft will ask for administrator password and will start SQL Server. During my installation I set password as “vSqlserver2017”. In the end you will get Setup completed successfully message.


14-   You have successfully completed MSSQL Server installation. On restarting you linux server, you can check SQL Server status by executing following command.


15-   We need to Install SQL Server tools by using following command. Using wget we need to download and copy prod.list on sources.list.d path.


16-   On getting permission message I am unable to copy on given path. I used same path as I did to register key for SQL Server.
17-   I downloaded prod.list file and copy it to sources.list.d


18-   Opening root as file manager by entering following command
“sudo nautilus”


19-   Following root path will open


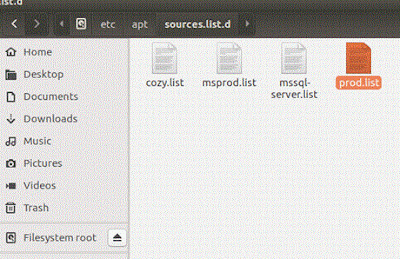
20-   Reaching at sources.list.d path copyà paste prod.list as follows


21-   It is recommended to run get-update command before and after any installation and then start installing tools by following command
“sudo apt-get install mssql-tools –y”


22-   Installation will start once all required data will be downloaded.


After completing installation we are going to perform basic SQL Server queries using linux Ubuntu command prompt.

23-   SQL Server is active and running. You can connect SQL Server using following command “sqlcmd –S (Server name) –U (username) –P (Password)”


24-   Performing basic SQL Server testing through command prompt.
a.       Create  database
b.      Create Table
c.       Insert data
d.      Query data


Monday, May 15, 2017

SQL Server on Linux step 2: Linux (Ubuntu ) installation using Virtual Box VM

In my previous post we learn how we can get free Virtual machine to install another operating system on our existing windows. We downloaded Oracle virtual Box Virtual Machine and decided to install Linux plate form on it. We downloaded Linux flavor Ubuntu 17.10 64 bit Server .iso image from given link and now we will learn how to install Ubuntu on Virtual Box VM. You can find previous post under following link.


Linux Ubuntu 17.10 installation on Virtual Box VM


1-      From your VM box right click -> on your VM and press “Start” or “Normal Start”.


2-      This will start Ubuntu setup. Load downloaded .iso file and press Start


3-      Setup will load Ubuntu from .iso file. Press Install ubuntu


4-      For installation of new operating system, either select erase and install Ubuntu or manual setup. As I am installing on a separate partitioned drive, I select Erase disk and install Ubuntu.


5-      You will get partition formation message. Press Continue


6-      You need to select time zone settings


7-      Press language for your keyboard.


8-      You need to create username and password. Remember password or write it somewhere for future use. I set password is same as username.


9-      You will setup complete message and need to restart setup.


10-   There are some settings needs to change in order to get better performance from installed virtual machine. Open Ubuntu VM settings. Move to System tab and base memory option under Motherboard.


11-   Switch to Processor tab and change your processor setting.


12-   In left side tab go to Network under Adapter 1 tab.
a.       Enable Network Adapter and select Bridged Adapter to select same network that is on your Windows system.
b.      Under Name: Select Network of wireless setting as required.
c.       Promiscuous Mode: Select Allow All.
d.      Tick Cable connected to work with Bridged Adapter.


13-   Setup your network setting as you setup in your windows machine.
a.       Start your Ubuntu VM and on top right corner. Open setting press Network.
b.      Under Network Proxy press proxy server to connect network server.
c.       Press Apply system wide and restart Ubuntu to apply new changes.


14-   Install putty on your windows system and you can use command prompt to connect Ubuntu from outside Ubuntu.


15-   Starting Linux (Ubuntu). To open root command Press Ctrl+Alt+T to open a terminal window. For security purposes (and to avoid damage), the root user account is locked by default. To safely run commands as root, you should use sudo instead. Enabling the root user can put your system at risk and is not recommended by Ubuntu.


16-   You can use Sudo apt-get update as follows


Wednesday, May 10, 2017

SQL Server on Linux step 1: Installing Oracle Virtual Box on Microsoft Windows

As Microsoft announces next version of SQL server that is ready to install on other plate forms then Windows. SQL Server 2017 CTP 2.0 is supported on Red Hat Enterprise Linux, SUSE Linux Enterprise Server, and Ubuntu. It is also available as a Docker image which can run on Docker Engine on Linux or Docker for Windows/Mac. Question is how to install Linux and SQL Server on it. I am going to show you step by step guide to install both Linux and SQL Server vNext. I tried to cover all aspects as much as possible in both command line and graphically.

SQL Server Latest Releases on Linux:

The next version of SQL Server on Linux will include all the standard SQL Server management features that come with the Windows version. These include advanced features like always-encrypted, row-level security and columnstore indexes etc. You can get a full list of features which are supported in this Microsoft link: SQL Server on Linux Release Notes.

Download Ubuntu:

The first step is to decide which platform is required to install SQL Server vNext. I decided to download Ubuntu as I already have little bit of experience with it. You can download latest version of Ubuntu form https://www.ubuntu.com/ . You will find a list of Ubuntu files to download. I downloaded Ubuntu-17.04 server 64bit (Zesty Zapus) as shown in pic (InstallUbunut-01)


Oracle VirtualBox

There are different ways to install Ubuntu on your machine. For this exercise I decided to use Oracle Virtual Box. VirtualBox is a powerful x86 and AMD64/Intel64 virtualization product for enterprise as well as home use. Not only is VirtualBox an extremely feature rich, high performance product for enterprise customers, it is also the only professional solution that is freely available as Open Source Software under the terms of the GNU General Public License (GPL) version 2. You can download Virtual Box – Windows host from following link https://www.virtualbox.org/wiki/Downloads

Before starting Virtual box installation it is benificial to download some other required tools during ubuntu installation. You can work directly in ubuntu plateform but there is another way to work by connecting through PuTTY. You can work with PuTTY untill you have openssh on your ubuntu server. You can install openssh directly from ubuntu or by downloading it and install form given path. Following is the image that is showing ubuntu and other downloaded files.


There are different ways to install linux. If you have Windows installed on your machine and want to install linux seperately, you can go for dual boot installation. Dual-booting is a technique which allows a single physical computer to run two or more operating systems. This is useful for experimenting with new OS without touching your existing setup. I have found a very good step by step installation guide on following link http://www.instructables.com/id/How-to-Dual-boot-Linux-and-Windows-on-a-PC-with-W/

I choose virtual box to install ubuntu from my existing Windows. Next is step by step example for installing oracle virtual box.
1-      Double click on the VirtualBox setup to start installation.

2-      This setup needs to check free space on your hard drive.
3-      You will get reset warning that you can read and press Yes.

4-      Setup will start installing Virtual box and it will take few minutes only depending on your machine performance.

5-      You need to install Oracle Corporation Universal Serial Bus, press install

6-      Setup may ask for some other network tools for installation
7-      You will get successful installation message, press Finish to start Oracle Virtual box

8-      After finishing setup Oracle VM Virtual Box Manager will open.

Create New VM using Oracle Virtual Box
1-      To start creating new VM setup, Press New icon from left top corner
2-      It will open new VM setup screen where you have to set name for your VM as we are installing Ubuntu for SQL Server so it will be “Ubuntu1710”

3-      Next is Type of your operating system installation, for us it will be Linux

4-      We need to select 64-bit because we have downloaded same version

5-      You need to set required RAM for the VM that will be part from total available system RAM. In this case I have mentioned 4GB out of 6GB. You need at least 3.5 GB in order to install SQL Server on Linux. If you do not have enough RAM, You can change it even after creating VM.

6-      Continue by pressing Next, You need to set Hard disk value. You can add it later or go for virtual hard disk now, which I have selected.

7-      Next pop will be used to select hard disk file type, I have selected Virtual Box disk image

8-      You have to select which type of storage you will prefer, I used dynamically allocated so that I can increase it when required.

9-      In this setup you have to select storage file location and initial size of your VM. I have set 32 GB and will increase on demand.

10-   Press “create” and your new VM will be created. You can see detail on VM main page

11-   Given file location name will be created windows folder.

You have successfully completed virtual box and now need to start installing Ubuntu setup on it.

From this point on words Ubuntu installation will start. I will publish step by step detail in my next post... keep reading :)