Search This Blog & Web

Showing posts with label High availability solution. Show all posts

Thursday, May 3, 2012

Failover techniques for Database Mirroring using SQL SERVER 2008


Fail-over techniques in database mirroring.There are different techniques for database mirroring.
  1. Automatic fail over
  2. Manual fail over
  3. Forced fail over


The following table summarizes which forms of failover are supported under each of the operating modes. 

High performance
High-safety mode without a witness
High-safety mode with a witness
Automatic failover
No
No
Yes
Manual failover
No
Yes
Yes
Forced service
Yes
Yes
No

Automatic Fail-Over:
To test database mirroring auto fail over solution you need to restart database engine and your Principal and Mirror servers will be reversed but you need to set your mirroring solution as (Principal – Witness - Mirror). You can view how we can test auto fail over solution look at this link.


Manual Fail-Over:
During a manual failover, the principal and mirror server roles are swapped for the database on which the failover occurs. The mirror database becomes the principal database and the principal database becomes the mirror. For example, the following table shows the how a manual failover swaps the roles of two mirroring partners: System


Forced Fail-Over:
We are now looking into Forced Service for database mirroring. This option is available against high safety but automatic failover is not available.  In the event of failure of the principal, the database service becomes unavailable. You need manual intervention to make the database service available.


Fail Over techniques for Database Mirroring using SQL SERVER 2008, Forced service


Fail-over techniques in database mirroring. There are different techniques for database mirroring.
  1. Automatic fail over 
  2. Manual fail over
  3. Forced fail over


The following table summarizes which forms of failover are supported under each of the operating modes.


High performance
High-safety mode without a witness
High-safety mode with a witness
Automatic failover
No
No
Yes
Manual failover
No
Yes
Yes
Forced service
Yes
Yes
No


We are now looking into Forced Service for database mirroring. This option is available against high safety but automatic failover is not available.  In the event of failure of the principal, the database service becomes unavailable. You need manual intervention to make the database service available.
This option is available only under all the following conditions:

·         The principal server is down.
·         WITNESS is set to OFF or is connected to the mirror server.

Forcing service suspends the session and starts a new recovery fork. The effect of forcing service is similar to removing mirroring and recovering the former principal database. However, forcing service facilitates resynchronizing the databases (with possible data loss) when mirroring resumes.
To force service in a database mirroring session when Principal is OFF

1.    Connect to the mirror server.
2.    Issue the following statement:

ALTER DATABASE <database_name> SET PARTNER FORCE_SERVICE_ALLOW_DATA_LOSS

The mirror server immediately transitions to principal server, and mirroring is suspended.

·         In the figure, the original principal server, Partner_A, becomes unavailable to the mirror server, Partner_B, causing the mirror database to be disconnected. After ensuring thatPartner_A is not available to clients, the database administrator forces service, with possible data loss, on Partner_BPartner_B becomes the principal server and runs with the database exposed (that is, unmirrored). At this point, clients can reconnect to Partner_B.

To verify that you need to go for following steps:


1. Configure Mirroring without Witness. You can see Principal and Mirror run healthy.


2. lets Disconnect principal and look at the mirror status, Mirror shows Disconnected and in recovery.


3. Mirror becomes disconnected then executed force service command


4. Mirror database become principal and you can access it now. 


5. Start Original principal server again and both databases goes into suspended mode


6. Go to Properties of principal database and press resume to get database back to online but message shows possible data lost.


6. Go to Properties of principal database and press resume to get database back to online. look at the final status here. Mirror has been active as principal and original principal working as mirror server.


Monday, April 30, 2012

Fail Over techniques for Database Mirroring using SQL SERVER 2008, Manual


Fail-over techniques in database mirroring. There are different techniques for database mirroring.
  1. Automatic fail over
  2. Manual fail over
  3. Forced fail over

Manual failover disconnects the clients from the database and reverses the roles of the partners. Only high-safety mode supports manual fail over.


During a manual failover, the principal and mirror server roles are swapped for the database on which the failover occurs. The mirror database becomes the principal database and the principal database becomes the mirror. For example, the following table shows the how a manual failover swaps the roles of two mirroring partners: System

The following figure illustrates an instance of using manual failover to maintain database availability while you upgrade a database server instance. When the upgrade is completed, an administrator may optionally fail over back to the original server instance. This is useful when the administrator wants to stop the mirroring session and use the mirror server elsewhere. In this way, a single server instance can be used repeatedly when updating a series of database server instances.


Manual failover initiates the following sequence of actions:
1.       The principal server disconnects clients from the principal database, sends the tail of the log to the mirror server, and, in preparation for switching to the mirror role, sets the mirroring state to SYNCHRONIZING.
2.       The mirror server records the log sequence number (LSN) of the last log record received from the principal as the failover LSN.
3.       If any log is waiting in the redo queue, the mirror server finishes rolling forward the mirror database. The amount of time required depends on the speed of the system, the recent workload, and the amount of log in the redo queue. For a synchronous operating mode, the failover time can be regulated by limiting the size of the redo queue. However, this can cause the principal server to slow down to allow the mirror server to keep up.
4.       The mirror server becomes the new principal server, and the former principal server becomes the new mirror server.
5.       The new principal server rolls back any uncommitted transactions and brings its copy of the database online as the principal database.
6.       The former principal takes on the mirror role, and the former principal database becomes the mirror database. The new mirror server quickly resynchronizes the new mirror database with the new principal database.

Manual fail-Over through Query
When the mirrored database is synchronized, the database owner can initiate manual failover to the mirror server. Manual failover can be initiated only from the principal server.

1.       Connect to the principal server.
2.       Set the database context to the master database:
3.       Issue the following statement on the principal server:


This initiates an immediate transition of the mirror server to the principal role.

Failover techniques for Database Mirroring using SQL SERVER 2008, Automatic


Fail-over techniques in database mirroring.
There are different techniques for database mirroring.
  1. Automatic fail over
  2. Manual fail over
  3. Forced fail over

Automatic Fail-Over:
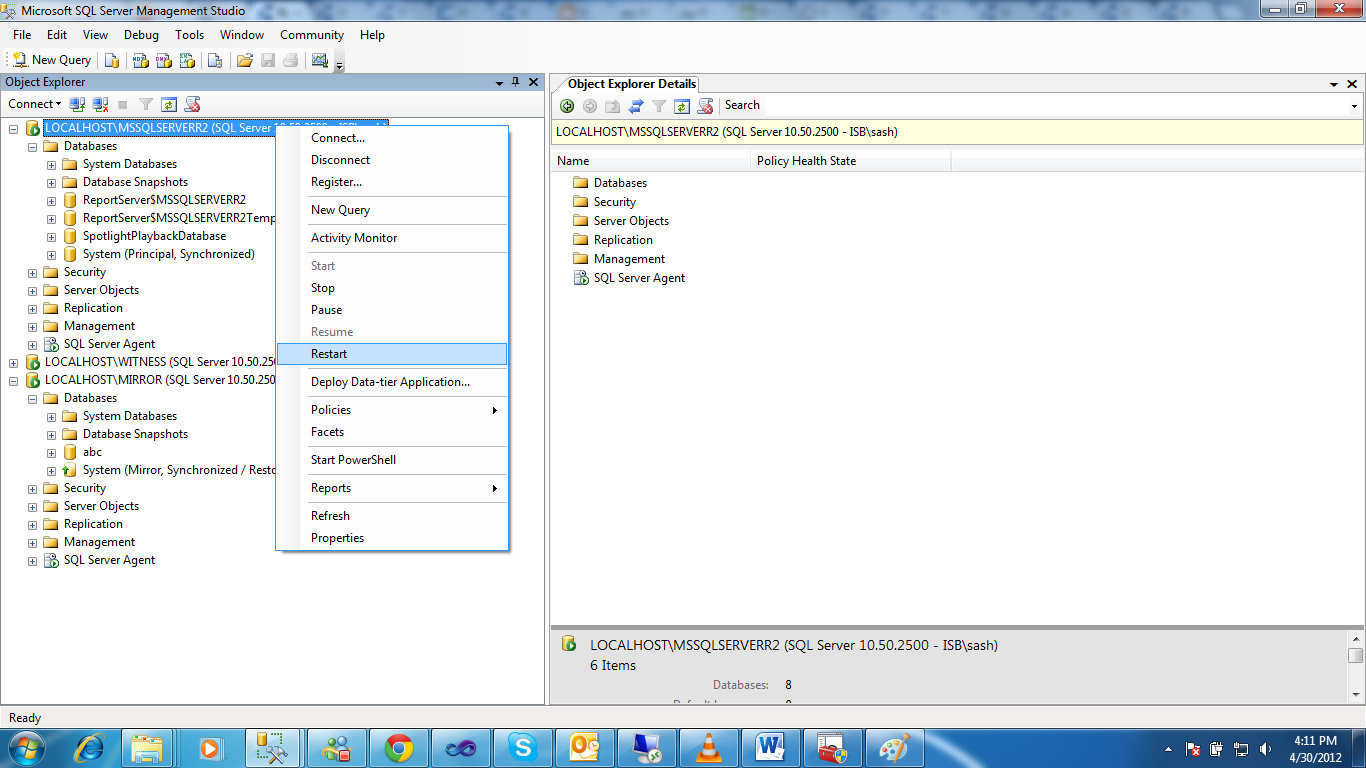
To test database mirroring auto fail over solution you need to restart database engine and your Principal and Mirror servers will be reversed but you need to set your mirroring solution as (Principal – Witness - Mirror). You can view how we can test auto fail over solution look at this link.


The following illustration shows a single instance of automatic failover copy from msdn help.


Initially, all three servers are connected (the session has full quorum). Partner_A is the principal server and Partner_B is the mirror server. Partner_A (or the principal database on Partner_A) becomes unavailable. The witness and Partner_B both recognize that the principal is no longer available the session retains quorum. Partner_B becomes the principal server and makes its copy of the database available as the new principal database. Eventually, Partner_A reconnects to the session and discovers that Partner_B now owns the principal role. Partner_A then takes on the mirror role.

Let see changes in SSMS
Server
Before failover
After failover
MSSQLSERVER
PRINCIPAL
MIRROR
MIRROR
MIRROR
PRINCIPAL


Look at this screen shot. Principal and Mirror are fully synchronized.


Look at this screen shot. We are going to restart database engine to test our fail over solution.


After successful restart Principal and Mirror has been changed.


Automatic fail-Over for one database:
If you want to test over fail over for any single database then you need to go to database mirror properties and press fail-over option to set one database as auto fail-over.


Future Work:

  • Manual fail-over with out Witness
  • Forced fail-over


Friday, April 27, 2012

Verify database mirroring solution for auto fail-over using SQL SERVER 2008


Previous Post:
   In my previous post we have learned how to setup database mirroring "Step by Step configuration of Database mirroring using SQL Server 2008". 

After successful configuration of data mirroring we have looked into current running states of Principal and Mirror server. We have configured our database mirroring setup using (Principal, Mirror and Witness) database instances. To verify that how mirroring works lets start with some database DML operation on principal server database.

Step 1: I have a table TeaserProspect on my System database in Principal.I am going to drop it.

Step 2: As per mirroring solution this change must reflect on mirror server automatically. Now the question is how can we verify that these changes successfully synchronized to mirror server. To verify that lets stop Principal server database engine to fail-over principal database. There are other way around to test fail-over and we will discuss those in later blogs.

Step 3: Now drill down Mirror server and look at the status on System database now. Previously it  shows "mirror, synchronized / restoring" but now it has been changed to " Principal, Disconnected." Remember principal server has been stopped. 

It means our Mirror server successfully changed to Principal server on fail-over without any downtime. Now lets figure out that our changes has also been transferred.


Step 4: Try to find "teaserProspect" table in system database. I have tried to find out using information schema DMV and nothing returns. Lets perform these steps again to complete Principal-Mirror-Principal cycle. 
To do so I have created "teaserProspect" table again but this time on newly active System database on Mirror Server.


Step 5: lets start our Principal server again and you will see it will show you as active mirror server. It means our Mirror server is Principal now and Principal server acting as a mirror.


Step 6: To verify our data changes i am going to restart our mirror server again.


Step 7: Principal and Mirror servers will reverse again.


Step 8: Lets check "teaserProspect" table in system database on Principal that we have created on Mirror server when it was Active.


:) Our table is there. It means we are able to get high available database mirroring solution on our servers. 

Hope you guys will get help to configure database mirroring on your servers. Please post your comments and queries if there are any.


Future Works:
In our future posts we will discuss some common error and problems I have faced during Administration mirroring solution. These are related to some common errors, user rights, database engine user and manual failover etc.

Step by step configuration of Database Mirroring in SQL Server 2008, R2


Previous Post:
In previous post I have define some ground work settings before starting database mirroring. 

We can implement database mirroring technique in different ways
1- Same machine or server with 3 different database instances install on it.
2- Different machines or servers for Principal, Witness and mirror.
3- Use same or different machines with Principal and Mirror there is no witness required.


I am going to explain database mirroring using 1st point. In this point i have installed three different instances of sql server 2008 on same machine. look at the picture below


From the picture above we can see following instances installed on my setting


  1. na-sash\MSSQLSERVERR2:   We will use this instance as a Principal Server.
  2. na-sash\mirror:   We will use this instance as a Mirror Server.
  3. na-sash\witness:   We will use this instance as a Witness Server.
To start database mirroring i am using a database "System" running on Principal server. 

Step 1: Take a full backup of system database.


Step 2: Open the mirror server and restore that database in Recovery mode as seen in following diagrams.


Remember to change RESTORE WITH RECOVERY to RESTORE WITH NO RECOVERY MODE


Pic Step-2


Step 3: Open the Principal server and get properties of System database. If you look at the System database that you have restored recently on mirror server. It will show you in restoring... mode.


Step 4: On properties go to the Mirror tab.


Pic step - 4


Step 5: Click on Configure security.


Pic step - 5


Step 6: SQL server will ask for Witness configurationAs we have already defined if we need to create auto fail over we will include witness server as well.


Pic step - 6


A conformation window will explain about 3 servers and if you want to add Witness server later you can unchecked witness server here


Pic step - 6 -1 


Step 7: 
First tab will configure your principal server settings. If you are using same server with different instances as I am using in my example then you need to change port number for each configuration step. look at the listener port and End Point Name. 


Pic step 7-1


Step 7-2: 
Second tab will configure your Mirror server settings. If you are using same server with different instances as I am using in my example then you need to change port number for each configuration step. look at the listener port and End Point Name. 


Pic Step 7-2 


Step 7-3: 
Second tab will configure your Witness server settings. If you are using same server with different instances as I am using in my example then you need to change port number for each configuration step. If you did not ticked Witness server check box in Step 6 then this window will not appear. look at the listener port and End Point Name.


Pic Step - 7-3


Step 8: 
 If you are using Domain account for all three servers and account has rights in all three servers then you will specify that account in blank text boxes. If you are using SQL Server account then leave it blank and it will users that you specify during step 7 connectivity.


Pic Step - 8


Step 9: 
 Final summery before setup will confirm all previous settings.


Pic Step - 9


Step 10: 
After you press finish you will step back to Mirror window but this time all three text boxes (Principal, Witness and Mirror) will have access path defined for mirroring. A conformation window will appear that will ask to Start Mirroring in High Safe Mode. Press start mirroring and on pressing refresh button at bottom you will see synchronized message as shown in pic below.


Congrats you have successfully configured database mirroring setup on you setup. To confirm that database mirroring drill down to you system database at Mirror server and you will see following status
 DB Name: (Mirror, Synchronized / restoring...)
and on the Principal server you will see following status
 DB Name: (Principal, Synchronized)

Previous Steps:


Next Steps: